News
Damp Proofing Cavity Membrane Fixing Plugs
Jun
Damp Proofing Cavity Membrane Fixing Plugs
We are commonly asked for advice on what type of fixing plugs and how many should be used to fix damp proofing cavity membrane to walls.
The answer is determined by the type and condition of the walls and the finish you are applying in front of the membrane.
The other point is whether the plugs should have some type of seal to prevent moisture from ingressing around the head of the plug.
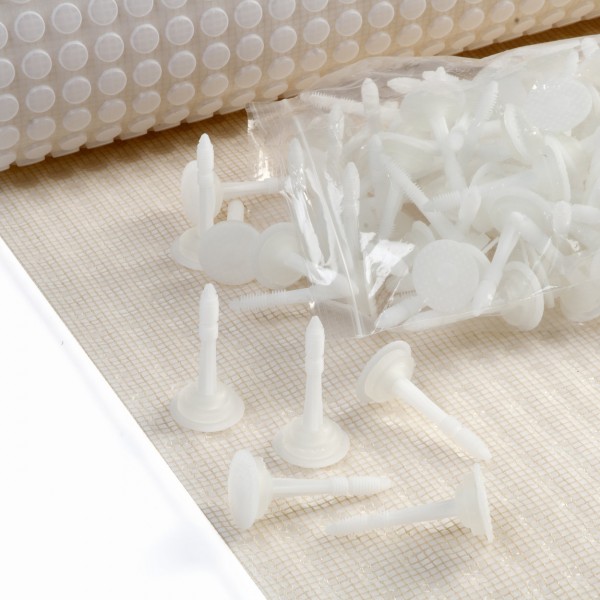
If you are fixing a membrane with a mesh welded to the face of it the ideal plug fixing is a Plaster Plug typically available in an 8mm diameter shaft either 50mm or 70mm long. This type of fixing can be rendered over or have dab adhesive applied to it to accept Plasterboard. This plug is most commonly used in above ground damp proofing after the insertion of a chemical damp proof course.
If you are using Plaster plugs to dot and dab to you should install at 250mm centres which is around 15 plugs per m2. If you are rendering to the membrane you are advised to reduce the centres to ensure the membrane is absolutely tight to the wall and use up to 20 plug fixings per m2. This will help to reduce cracking in the render.
In basement waterproofing situations the most commonly used membrane is an 8mm stud clear cavity membrane. This membrane can be battened to or you can install an independant stud frame.
The plug fixing typically chosen to install this type of membrane is a Brick Plug fixing. There are various brand names for this type of plug but they all have a 2″ hole formed in the middle of the plug which will accept a size 10 screw. Ideal to batten out from. If you do finish in this way you require at least 5 plugs per m2 based on 600mm x 400mm centres.
If you are going to install and independant stud frame then there is no stipulation to the number of plugs required per m2 but I advise to work to 1 per m2.
The drill bit required for Brick plug fixings is 10mm.
The other type of plug fixing used with installing membrane to walls is the Cob Plug fixing. This fixing is typically used in walls that will present a challenge to get a secure fixing using Plaster or Brick plug fixings. Cob plugs have an ‘anchor’ pin which are designed to expand the shaft of the fixing plug once tapped into the wall.
Where walls are likely to be damp or wet on a consistent basis or walls above ground that are soil retaining or still have a high degree of residual moisture it is recommended the plug fixing you choose has a water proof seal to stop moisture from wicking along the shaft of the plug fixing and in front of the membrane.
There are three options:
1) Butyl rope
2) Plug seals
3) Mastic
My own favourite is the butyl rope as this will form a great seal around the head of the plug once it is tapped into the wall. One roll of butyl rope can seal up to 100 plug fixings.
Finally, just to offer some installation tips; getting a firm anchor to the wall with each plug fixing is very important to ensure membrane remains ‘stuck’ to the wall and any finish in front of it does not want to pull off the wall. The condition of the wall can sometimes make this very challenging. If you are working with a stock brick wall but which is in very weak condition you will be advised to dub it out or even render it completely with sand and cement. Not a bad thing as this will improve the primary damp or waterproofing barrier but it will make fixing the plugs so much easier and save time which will offset the cost of building up the wall.
Alternatively, if the wall is friable in just a few places you can splash a dot of luminous spray paint to all the locations you want to put a fixing in so that when you dress the membrane to the wall you will see the anchoring points through the membrane.
It is also a worthwhile time saving tip to have smaller dimension drill bits to hand such as 7mm and 9mm which can be used to help secure the plugs in smaller diameter holes. We keep these difficult size drill bits in stock for just such situations.